eTrk Server & Web Portal
Prerequisites
Docker & Docker Compose. Required for deploying the Web App and Web API.
Email ID for Notifications Required for system notifications (Multi-Factor Authentication should be disabled).
Ubuntu Server for deployment (Preferred for compatibility).
Clone the Repository
git clone https://github.com/Kumaran-eTrk/Server-Web-Portal.git
Web Portal Installation
Modify your neccessary configuration in .env
Server Url
VITE_API_URL="YOUR SERVER URL" ## http://kumaran.com/api/v1/monitoruser
Azure Authenciation
# Enable Azure authentication

     VITE_AZURE= "FALSE" -- Azure Authentication

# Azure AD App Registration details

    - Go to https://portal.azure.com and sign in with your Azure credentials.
    - In the left-hand menu, select "Azure Active Directory".
    - Under Manage, click "App registrations".
    - Select your application from the list. (Or click "New registration" to create a new one.)
    - In the application Overview page, copy the value labeled "**Application client ID**".
    - Still in the Overview page, copy the "**Directory tenant ID**".

    VITE_AZURE_CLIENTID= "AZURE CLIENT ID"
    VITE_AZURE_AUTHORITY= "https://login.microsoftonline.com/<Tenant ID>"

# Azure Redirect url

  Once you successful logged in through azure credentials,It will Redirect you to application url

    VITE_REDIRECT_URL= "YOUR SERVER URL" #https://kumaran.com/
Enable Authenciation
Enable database authentication to allow users to log in using their email and password based on database credentials.
If set to "FALSE", the system will prompt for a username and password, initiating LDAP authentication instead.
In case of LDAP authentication, ensure that ldap mode is set to true in the server installation under the login configuration.

    VITE_DB_AUTH= "TRUE"   -- Database Authentication.
Replace the Logo’s in the public folder
Please ensure the following minimum image resolutions:

    Login_Logo.svg   : 250 × 70 pixels

    Sidebar_Logo.png : 130 × 120 pixels

    favicon.png      : 130 × 120 pixels
Server Installation
modify the neccessary configurations in .env file
Base Url
# HTTP/HTTPS URL
URL=http://localhost  #https://kumaran.com/

Replace your Domain URL
Login Configuration
LDAP configuration controls whether LDAP authentication is enabled (`true`) or disabled (`false`) and connection settings.


# LDAP Configuration
    Mode=false


    change the mode to false , it will the Database Authentication
    Or else it will be LDAP Authentication.

    # LDAP Configuration
        IPADDRESS=Server Address
        USERDOMAINNAME=domain
Default Password Configuration
It controls the default password of the user when the authentication happens through database.

   # User Default Password
   DEFAULT_PASSWORD=Welcome@123
Database Configuration
Set up the database configuration to allow the etrk agent to connect and interact with the designated database.

    This is the Default value ,if you want please replace your own credentials.
    # Postgres DB Configuration
        DB_USER=kumuser
        DB_PASSWORD=kum@5678!
        DB_NAME=etrk
        DB_PORT=5432
Email Configuration
Email settings enable to send the mail notifications about employee activity to respective reporting  managers.

# Mail Configuration
MAIL_ADDRESS=Your Mail ID
MAIL_PASSWORD=Password
MAIL_HOSTNAME=Hostname
MAIL_PORT=port
Non Logged Notification Configuration
Configure the email triggering time to notify reporting managers about user login status.The email will list users who have not logged in by the specified cut-off times.
 The time must be set in UTC, using a 24-hour format,
and can only be specified on an hourly basis (e.g., 10:00, 17:00 — not 10:30 or 17:45).


# NON LOGGED Notification
MORNINGHOURUTC=5
AFTERNOONHOURUTC=8
EVENINGHOURUTC=12
Weekly Average Report Notification Configuration
Configure the email triggering time to send users weekly average reports to their respective reporting managers.
The time must be set in UTC using a 24-hour format, and the email will be triggered only on Mondays.


# Average Hours Notification
AVERAGEHOURUTC=4
AVERAGEMINUTEUTC=0
AVERAGESECONDUTC=0
Consolidation Weekly Average Report Notification Configuration
Configure the email triggering time to send the consolidated report of users weekly averages to their respective reporting managers. The time should be set in the UTC time zone
using a 24-hour format and will trigger only on Mondays.


# Consolidate Average Hours Notification
CONSOLIDATEHOURUTC=3
CONSOLIDATEMINUTEUTC=0
CONSOLIDATESECONDUTC=0
Agent Status Report Notification Configuration
Configure the email triggering time to send a consolidated report of users agent (application) running status to the IT Administrator Team.
The time should be set in UTC using a 24-hour format and will trigger daily in the morning, afternoon, and evening.
It can only be specified on an hourly basis (e.g., 10:00, 17:00 — not 10:30 or 17:45).

# Agent Status Notification
MORNINGHOURUTC=4
AFTERNOONHOURUTC=8
EVENINGHOURUTC=12
Agent Status Report Email Configuration
Configure the email to send the consolidated report of users etrk agent running status to their System Administrator Team.
The time should be set in the UTC time zone  using a 24-hour format and will trigger daily on morning,afternoon and evening .

   # SysAdmin Email
   EMAIL = Your Sys Admin Email
CC Email Configuration
Configure the email to allow adding multiple CC addresses, such as HR and others, for the Weekly User Average Report notification in addition to the reporting managers.
   # CC Email's
   CC_EMAIL=["EMAIl ID"]
Average Hours Configuration
Configure the hours to send an weekly users average report  to users only who have average working hours less than the specified average hour.

   # AverageHours
   Hours=15
Encryption
Configure used to encrypt the agent product key.Generate the key using the command

``node -e "console.log(require('crypto').randomBytes(16).toString('hex'))``

# API Security Keys
   AGENT_KEY= "YOUR ENCRYPTION KEY"
JWT Authenciation
Configure used to set JWT Authenciation to generate the token .Generate the key using the command

``node -e "console.log(require('crypto').randomBytes(16).toString('hex'))``

   # API Security Keys
   JWT_KEY= "YOUR SECRET KEY"
Reset Password Expiry
Configure the expiration time of reset password token through mail.

   # Reset password link expiry minute
   EXPIRYMINUTES=5
PgAdmin Web Access
Configure the username and password to access the database anywhere using web browser.

This is the Default value ,if you want please set your own credentials.

  # Pgadmin Configuration
  PGADMIN_EMAIL=sample@email.com
  PGADMIN_PASSWORD=sample@5678!@
Database Access:
Open the `localhost/pgadmin4` in the browser.(Default url)

Login with the given credentials in the .env file.

Connect the server by giving the  following credentials  which was mentioned in docker.compose.yaml:

Hostname/Ip - postgres.
Database Name - usermonitor.
Username - <Username>
Password - <Password>
Deployment in server
After modification of the configurations for both eTrkServer and eTrkWebPortal
- ├── Parent Directory/
├── eTrkWebPortal ├── eTrkServer ├── eTrkVideoApi └── docker-compose.yaml
`cd Parent Directory`
Deploying Docker Compose:
Execute the following command to deploy the Docker Compose application:

`docker-compose up -d --build`  // for up the application.
`docker-compose down` // for down the application.
Verifying Deployment:
Once the deployment process completes, verify that the UI and API services are running correctly.By using this commands,we can verify the successful deployment.
`docker ps` -> listing all running containers
`docker logs container_name`
Verify Database
Kindly check the database in pgAdmin after starting the Docker server to verify whether the tables have been created or not.
Please execute the procedures from ‘Stored Procedures.txt’ located on the eTrkServer within your database’s Procedures section
Insert scripts for the initial record of the table :
1).ProjectMaster Table
INSERT INTO "ProjectMaster" ("Id", "ProjectName")
VALUES ('9vcf57-87d2-4a4a-bad5-c3468bc7f95d', 'Demo Project');
2).UserData Table
INSERT INTO "UserDatas" ("Id", "Email", "DisplayName", "ReportingInto", "Division", "Location", "JobTitle", "ReportingIntoMail", "Branch", "ProjectId", "LocalADDomain", "LocalADUserName", "Password", "ModifiedBy", "ModifiedDatetime", "isDelete","VersionId","ShiftStartTime","ShiftEndTime","IsScreenshot")
VALUES ('7fcf57-87d2-4a4a-bad5-c3468bc7f95d', 'user@gmail.com', 'Employee name', 'Manager name', 'Migration', 'India', 'Programmer', 'manager@example.com', 'Chennai', '9vcf57-87d2-4a4a-bad5-c3468bc7f95d', 'domainname', 'username', 'c75f28325cfa028ea13872f977a29e0e87c99a4f390fe260f24d7e1f05fb8d75', NULL, NULL, false,'1.0.0','9:00 AM','18:30 PM',true);
3).Role Table
INSERT INTO "RoleMaster" ("rolename", "description", "ModifiedBy", "ModifiedDatetime")
VALUES ('Admin', 'Admin access', NULL, NULL),
('Manager', 'Manager access', NULL, NULL),
('System Admin', 'System Admin access', NULL, NULL);
4).UserRoles Table
INSERT INTO "UsersRoles" ("RoleId","useremail","ModifiedBy","ModifiedDatetime")
VALUES ('1','user@gmail.com',NULL,'2024-03-20 11:27:29');
5).Holidays Table
INSERT INTO "Holidays" ("Id", "Holiday", "Date", "Location", "Branch", "ModifiedBy", "ModifiedTime")
VALUES ('5dcf57-87d2-4a4a-bad5-c3468bc7f93e','New year', '2024-01-01 ', 'India', 'Chennai', NULL, NULL);
Screenshot Directory
The captured screenshots are automatically saved in a dedicated folder named “Screenshots” within your deployment server. This directory serves as the centralized storage location for all user screen captures taken by the agent.
├── Screenshots ├── Parent Directory/
├── eTrkWebPortal ├── eTrkServer ├── eTrkVideoApi └── docker-compose.yaml
Generate Product Key
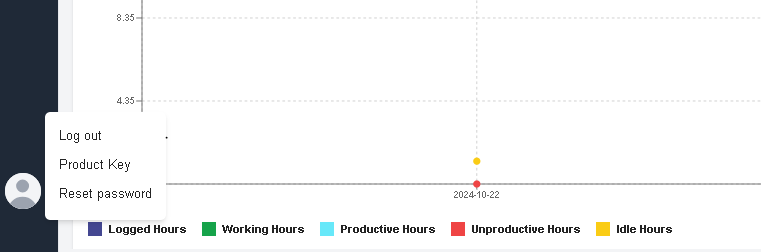
After launching the eTrkWebPortal server, log in to the web portal using the credentials stored in the UserData table in database. Email is user@gmail.com and default password is Welcome@123
Note
Only users with the Admin role have the permission to generate a product key within the web portal.